
Creating a New Interface
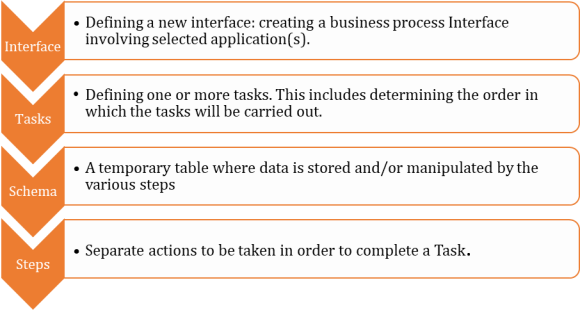
Creating a new interface is the first step in the process of establishment of a scheduled procedure that includes a variety of tasks connecting two (or more) specific applications. The recommended order to define various entities:
Note: As some of the Schema definitions are automated, the order may shift slightly in specific cases.
In addition, depending on the systems involved in the transactions, you may need to define specific parameters.
Note: As some of the parameters are used by various Steps, you may need to define a parameter prior to defining a new Step.
To create a new interface, select Interfaces in the Navigation Pane and click New on the Toolbar. The Interface page opens.
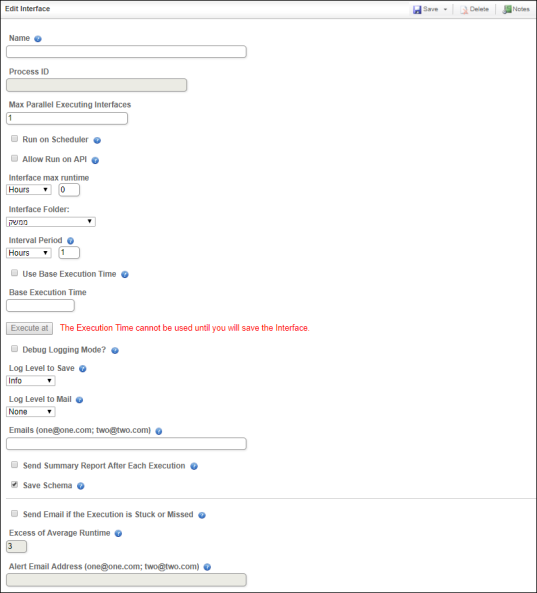
The New Interface Page
The fields listed in this page aid in defining the interfaces schedule – when it will run and other relevant details. The following table describes and explains the Interface page fields.
| Fields | Description |
|---|---|
|
Name |
Provide a name. Recommendation: list the names of the applications that are being connected by this interface. |
|
Max Parallel Executing Interfaces |
Enter the quantity of the interfaces. |
|
Run on Scheduler |
Click to enable. This determines whether the interface will run manually or automatically. The run is scheduled via the IConduct scheduler. |
|
Allow Run on API |
Click to enable. This checkbox allows initiating the interface using IConduct API.The run is scheduled via the IConduct API. |
|
Interface max runtime |
Select a parameter for the interface execution. Available options:
|
|
Interface Folder |
A folder, where the new interface will be created.Choose a folder from the drop-down menu. |
|
Interval Period |
Use to determine the time lapse between scheduled repeats of the interface to wait before re-running the interface. First, select the time unit, then select the amount of time. If you select hours and an interval of 10, then the scheduler will run the interface once every 10 hours. Available options:
|
|
Use Base Execution Time |
Select to define a specific date and time as the starting point for the predefined intervals. If you select 10:00 am and set the interval to one hour then the interface will run every hour on the hour. This is true for every time difference, whether it is minutes, hours or days. Optional. The system will run this interface based on the definitions, starting from when it is first activated. |
|
Base Execution Time |
Select the time and date from the calendar. |
|
Execute at |
Use to select one or more specific dates and times on a daily/weekly basis. |
|
Debug Logging Mode? |
Select to run the interface in this mode. The log created in this mode contains additional error information. Use to make sure that the new interface has been defined correctly. |
|
Log Level to Save |
|
|
Log Level to Mail |
Select the level of detail that will be saved to a log file during a transaction and mailed to selected email addresses at the end of a transaction. The same 6 levels of data are available. It is possible to receive log data on an individual Step level as well as for the whole Interface. |
|
Emails |
If you selected to send logs by email, list one or more email addresses. Separate the email addresses by a semi-colon (;). |
|
Send Summary Report After Each Execution |
Select to receive a summary report after each execution, regardless of the log options. The summary report contains transaction data. |
|
Save Schema |
Select if you want it to be saved. Save Schema to enable downloading in transactions list. |
|
Send Email if the Execution is Stuck or Missed |
Select if you want to receive email alerts. |
|
Excess of Average Runtime |
Use to set the limits for acceptable average interface runtime. The notifications are sent if the interface execution exceeds its average runtime by the times defined in this field. Becomes active after the Send Email if the Execution is Stuck or Missed checkbox is enabled. |
|
Alert Email Address |
Use to enter the email address(-es) for the notification sends. To list multiple addresses, use a semi-colon separator. Becomes active after the Send Email if the Execution is Stuck or Missed checkbox is enabled. |

To Create a New Interface:
- Select Interfaces in the Navigation Pane.
- Click New. The Edit Interface page opens in a new window.
- In the Name box, type a relevant name for the new interface.
- Click Run on Scheduler to enable this feature (optional)
- In Interface Folder select a folder from the drop-down list where you want to create the new interface.
- Select an Interval Period from the list.
- Enter the appropriate interval in the second box.
- Select Use Base Execution Time to determine a fixed date for the scheduling (optional). Remember to be precise.
- Click the Base Execution Time box. A calendar opens.
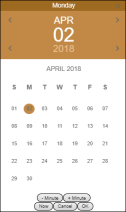
Calendar
- Click Now or select a date from the calendar. Type in the time.
Warning: Be sure you want to select Now before clicking the option. The interface will be executed immediately.
- Click OK when you have completed your selections.
- Click Execute at to set up a specific date and time (one or more). The Execution Time window opens:
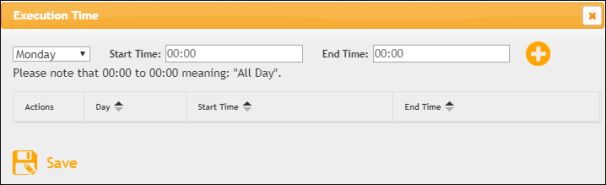
Execution Time Definition Window
- Select a Day from the list.
Note: You can choose the All days option to run this interface daily.
- Click the Start Time box. A Clock will open in a separate window, listing the current time.
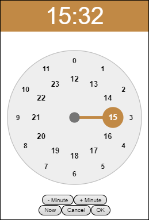
Execute Time Clock
- Select time using the available options.
- Click OK when you have completed your selections.
- Click the End Time box. A Clock will open in a separate window, listing the current time.
- Select time using the available options.
- Click OK when you have completed your selections.
- Click the plus icon to add additional dates and times to the selection. Repeat from Step 12 to Step 19, as many times as necessary. Your selections will appear in a table on this page:
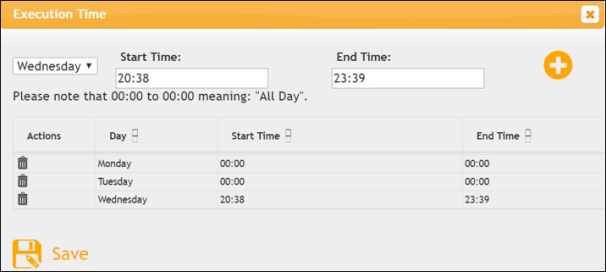
Execution Scheduler
- Click Save when you have completed your selections.
- Click Debug Logging Mode? to enable this feature.
- Select the Log Level to Save from the list.
- Select the Log Level to Mail from the list.
Note: You can choose to define this option on a step-by-step basis.
- In the Emails box enter one or more email addresses.
- Click Send Summary Report After Each Execution to enable (optional).
- Click Save Schema to enable this feature.
- On the Edit Interface Toolbar, click Save. The platform provides you with two options.
- Click Save & Close to close the interface and end the session, or
- Click Save & New to save and close the current interface and begin a new session.
The new interface is listed in the Interface Table.
When a new interface is created, it is listed in the Navigation Pane as a main branch with three new folders: Tasks; Parameters and Transactions.
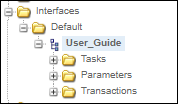
The New Interface Folder